8 Basics of Digital Photo Editing Workflow
Digital photo editing is an important part of modern photography, that bridges the gap between capturing a moment and presenting it as a polished, stunning image. Whether you’re a professional photographer or a passionate hobbyist, mastering the digital photo editing workflow can help you elevate the quality of your work and make sure your photos make a lasting impression.
Introduction
In the digital age, taking a photograph is just the beginning of the creative process. The true magic happens during the editing phase, where raw images are transformed into visual masterpieces. This process, known as the digital photo editing workflow, involves a series of steps by step guide that help photographers enhance their images, correct flaws, and bring their artistic vision to life.
A well-defined photo editing workflow not only streamlines the editing process but also ensures consistency and quality across your entire photo collection. Understanding each step in this workflow is important, as it help you to work efficiently and produce high-quality results. In this article, we will focus on the basics of the digital photo editing workflow, providing you with a comprehensive guide to improving your editing skills and creating stunning visuals.
What is Digital Photo Editing Workflow?
Digital photo editing workflow is a step by step guide that photographers follow to edit and enhance their photos. This workflow encompasses everything from importing and organizing images to making basic and advanced adjustments, applying creative effects, and finally, exporting and backing up the finished photos. Each step in the workflow is designed to address specific aspects of the photo editing process, ensuring that the final image is polished and professional.
By following a consistent workflow, photographers can maintain a high standard of quality in their work while also saving time and effort. The workflow helps in organizing the editing tasks logically, allowing photographers to focus on creative aspects without getting bogged down by technical details.
Whether you are working on a single image or editing a large batch of photos, a well-structured workflow ensures that you can efficiently manage your editing tasks, from start to finish. In the sections that follow, we will explore each step of the digital photo editing workflow in detail, providing practical tips and insights to help you enhance your editing process and achieve stunning results.
Digital Photo Editing Process
Here are the 8 fundamental steps involved in a good photo editing process, to ensure your images look their best.
1. Organizing Your Photos

The first step in any digital photo editing workflow is organizing your photos. This involves importing your images into a photo management software, such as Adobe Lightroom, Capture One, or even basic tools like Apple Photos or Google Photos. Proper organization helps you keep track of your images, making it easier to find and edit them later.
2. Culling and Selecting the Best Shots

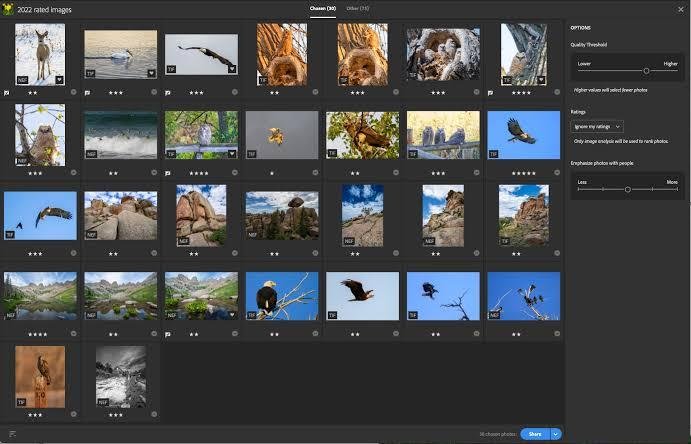
Culling is the process of sorting through your photos to select the best ones for editing. This step is important as it saves time and ensures that you’re only working with the highest quality images. Look for photos that have good composition, exposure, and focus. Delete duplicates or those with obvious flaws.
3. Basic Adjustments

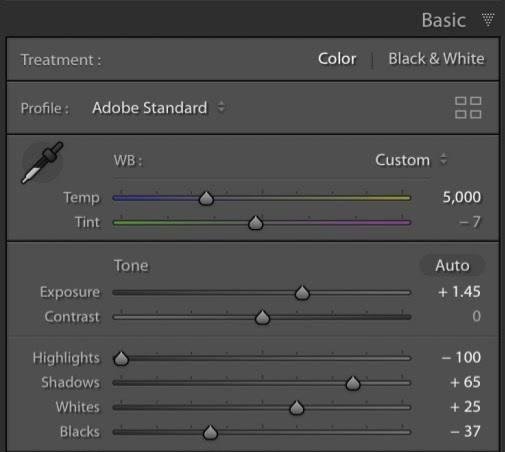
Once you’ve selected your best shots, it’s time to make basic adjustments. These adjustments usually include correcting the exposure, contrast, white balance, and saturation. Tools like Lightroom and Photoshop offer sliders for these adjustments, making it easy to fine-tune your images.
4. Cropping and Straightening

Cropping helps you improve the composition of your image by removing unnecessary elements. Straightening ensures your horizon lines are level, which is particularly important in landscape photography. These adjustments can greatly enhance the overall impact of your photos.
5. Advanced Editing

Advanced editing involves more detailed adjustments such as retouching, removing blemishes, and using advanced tools like layers and masks. Photoshop is particularly powerful for these tasks, allowing you to make precise edits and enhancements.
6. Applying Filters and Presets

Filters and presets can significantly speed up your editing process and give your images a consistent look. Many photographers create or download presets for Lightroom, which can be applied with a single click. While filters are often used on social media platforms, presets are preferred for professional photo editing.
7. Final Touches and Exporting

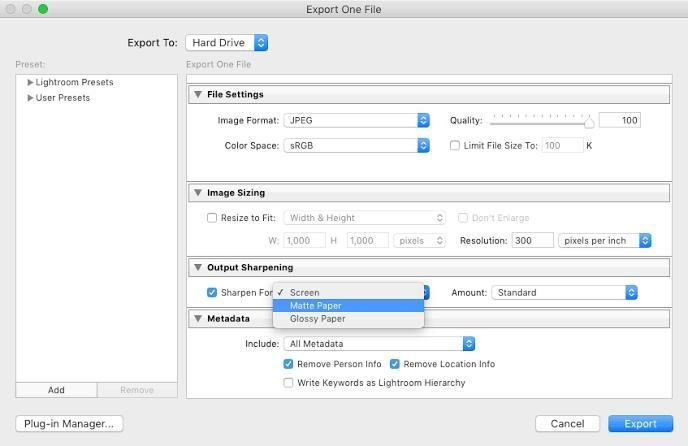
Before you finalize your edits, make sure to zoom in and inspect your image for any minor issues that need correction. Once satisfied, it’s time to export your images. Exporting involves saving your edited images in the desired format and resolution. For web use, JPEG is commonly used, while TIFF or PNG formats are preferred for printing.
8. Backing Up Your Photos

The final step in your digital photo editing workflow should always be backing up your edited and original photos. Use external hard drives, cloud storage solutions like Google Drive, Dropbox, or dedicated backup services to ensure your precious memories are safe.
Conclusion
Mastering the basics of digital photo editing workflow is important for anyone looking to produce high-quality images. By following these steps and utilizing the right keywords, you can streamline your editing process and achieve professional results. Remember to stay organized, make thoughtful adjustments, and back up your work to ensure your photos are always safe and easily accessible.
Recent Blogs
[psac_post_carousel show_author=”false” show_tags=”false” show_comments=”false” show_content=”false” slide_scroll=”2″]


